您的购物车目前是空的!
How to Create a Paint Booth in Your Garage: A paint booth allows you to achieve flawless, smooth paint jobs while keeping your workspace free of unwanted splatters.
Part1 Measuring and Cutting the Poles
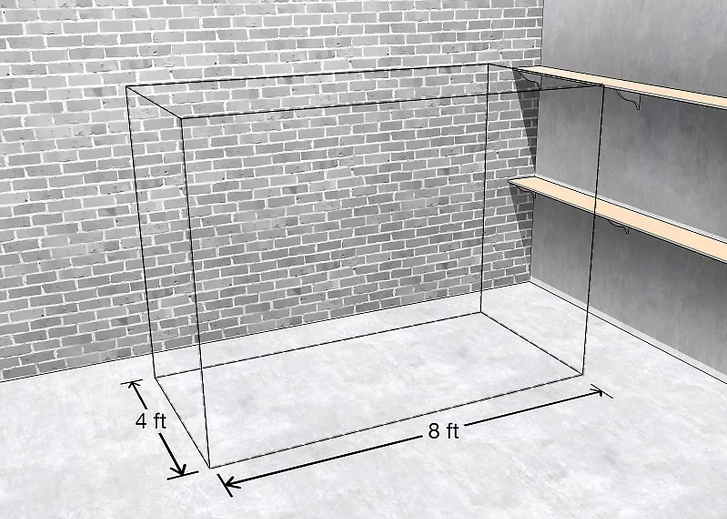
1. Measure the Dimensions for Your Paint Booth
To determine the size of your paint booth, measure your available space and consider the scope of your project. The size of your garage will play a crucial role in deciding how big the booth needs to be. For instance, an 8-foot (2.43 m) wide booth is ideal for a single-car garage or large patio and can easily fit a full-sized vehicle. However, for most other projects, a booth of 8 by 4 feet (2.4 by 1.2 m) is often sufficient.
Garage Size Considerations
A standard single-car garage typically measures between 9 to 10 feet (2.7 to 3.0 m) wide, though some larger garages can range from 12 to 14 feet (3.7 to 4.3 m).
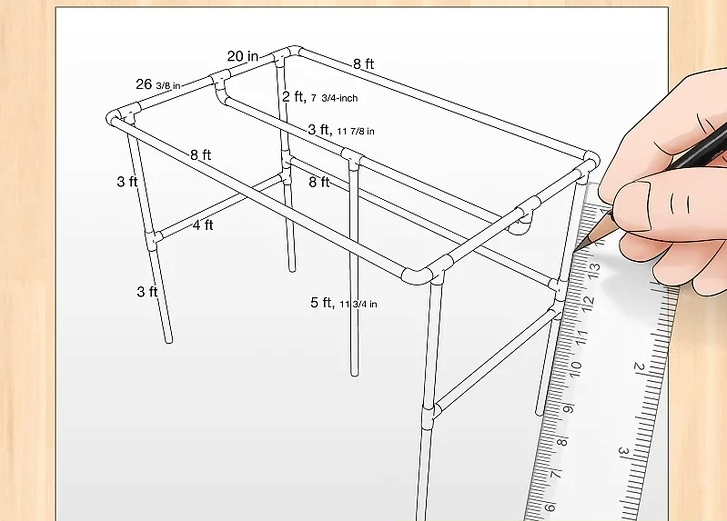
2. Sketch the Frame to Estimate Pipe Requirements
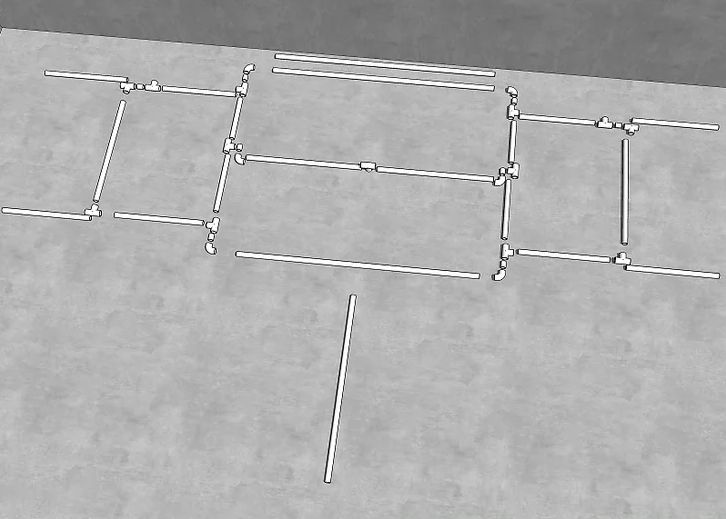
Before purchasing materials, sketch out a rough design of your booth to determine how much PVC pipe you’ll need. The frame will require vertical pipes at each corner, vertical supports along the back wall and side walls, plus horizontal pieces along the top and middle sections of the booth.
Material Estimate for Your Project
For a booth measuring 8 by 4 feet (2.4 by 1.2 m), the material breakdown would be:
- 9 sections of 10 feet (3.0 m) PVC pipe
- A diameter of 1.25 inches (3.2 cm) for sufficient stability
- PVC pipes are typically sold in 10-foot (3.0 m) long sections
3. Determine the Exact Lengths of Pipe You Need
After sketching your frame, calculate the exact lengths of pipe required. Split the top sections into two for extra support, and divide the middle pole across the top into two vertical segments for additional reinforcement. Ensure the poles for height are split into two as well, ensuring all parallel pipes align evenly.
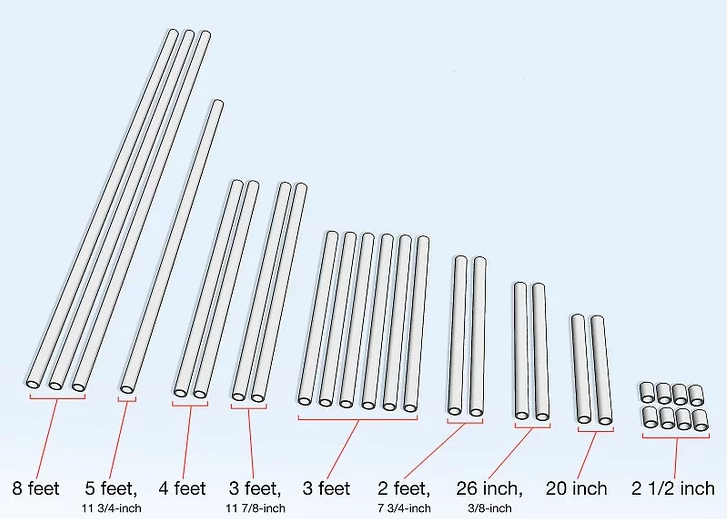
Pipe Length Breakdown
For this example project, you’ll need the following sections:
- 3 x 8-foot (2.43 m) sections
- 1 x 5-foot, 11 3/4-inch (1.82 m) section
- 2 x 4-foot (1.22 m) sections
- 2 x 3-foot, 11 7/8-inch (1.22 m) sections
- 6 x 3-foot (0.91 m) sections
- 2 x 2-foot, 7 3/4-inch (0.806 m) sections
- 2 x 26 3/8-inch (0.67 m) sections
- 2 x 20-inch (0.51 m) sections
- 8 x 2 1/2-inch (6.35 cm) sections

4. Mark the Cutting Points on the Pipes
Once you’ve gathered your PVC pipes, measure and mark where you need to cut each section. Use a permanent marker to clearly designate cutting points. Lay out all the pipes before cutting to verify the measurements.
Accuracy is Key
Proper measurements ensure each piece fits together correctly, so double-check your layout before making any cuts.
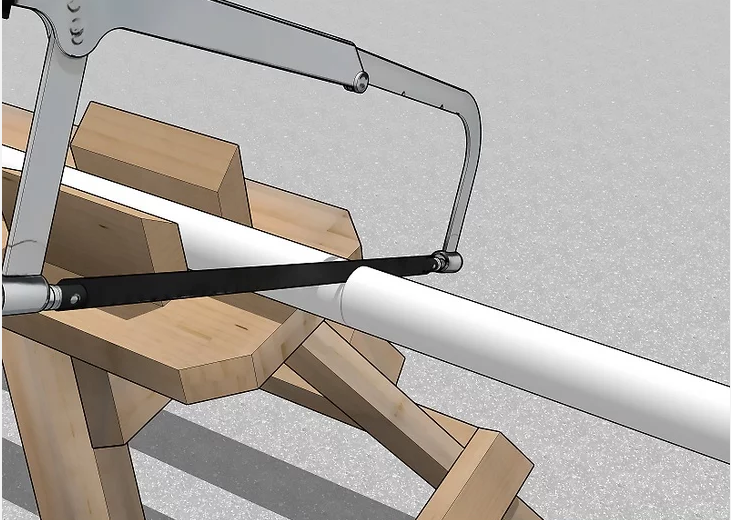
5. Cut the PVC Pipes to Length
After marking your cuts, proceed to cut the PVC pipes to the designated lengths. Secure the pipes in a workbench with two planks acting as a vise or use a table-mounted vise for better stability. A PVC saw or clamp-style pipe cutter is ideal for making precise cuts.
Cutting Tips
Ensure clean, straight cuts by sliding the saw back and forth with light pressure. After cutting, smooth the pipe edges with a sanding block for a finished look.
6. Assemble the Frame Layout
Arrange the cut PVC pipes as they will be connected. Use elbows for the corners and T connectors where three pipes meet. You’ll also need small connecting pieces to attach the T connectors to the elbows at the corners.
Frame Assembly Overview
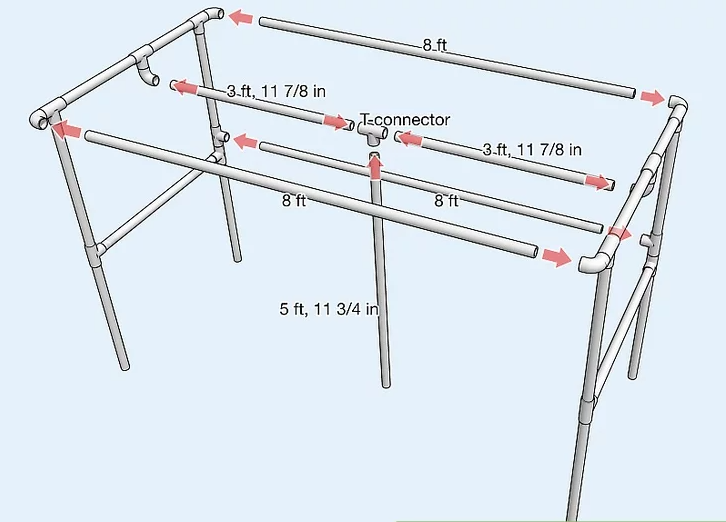
- The 3-foot pipes will form the four vertical posts at each corner.
- 8-foot sections go along the top horizontally (front, back, and middle of the back wall).
- 5-foot, 11 3/4-inch sections should be placed vertically in the middle for added stability.
- Smaller sections (2-foot 7 3/4-inch and 26 3/8-inch) create the horizontal top frame.
References
- DIY PVC Frame Construction Guide: Link to detailed instructions
- Best Tools for Cutting PVC Pipes: Learn more
Part2 Connecting the Pipes
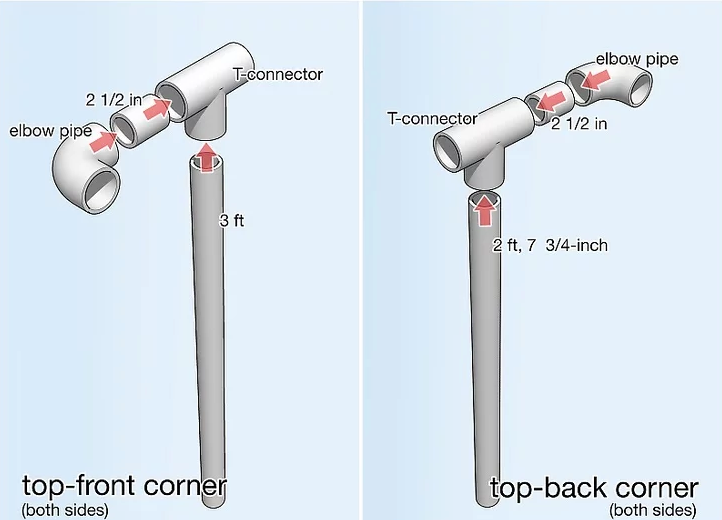
1. Attach T Connectors and Elbow Connectors to the Corner Poles
Start assembling the corners by attaching a T connector and an elbow connector to the top of each corner pole. Begin with the front corner—connect the T connector to the top of a 3-foot (0.91 m) pipe, then insert a small 2 1/2-inch (6.35 cm) piece of pipe into the joint extending toward the front. Attach the elbow connector to this small section, which will support the front pole along the top. Repeat this process for the back poles using 2-foot, 7 3/4-inch (0.806 m) sections, but the elbow connectors should extend toward the back.
Assembly Tips
Ask for assistance if possible to make the assembly smoother, especially when positioning the elbow connectors.
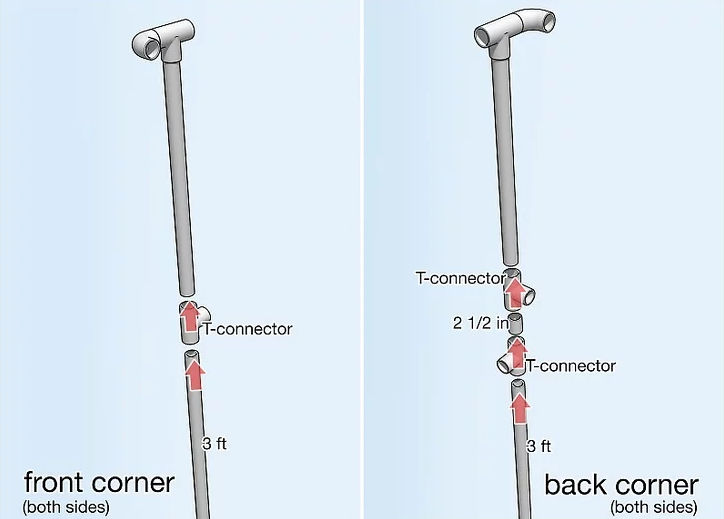
2. Build the Corner Posts with T Connectors
Next, create the rest of the corner posts by attaching T connectors to the front and back poles. For the front corner, connect the top section to the 3-foot (0.91 m) bottom pole using a T connector, ensuring the opening faces the back of the booth. In the back, use a small pipe section to connect two T connectors at the middle of the pole. One should face toward the front, while the other should point to the back of the booth.
Post Construction
This step solidifies the structure of the corner posts, which will be integral in holding the overall frame.
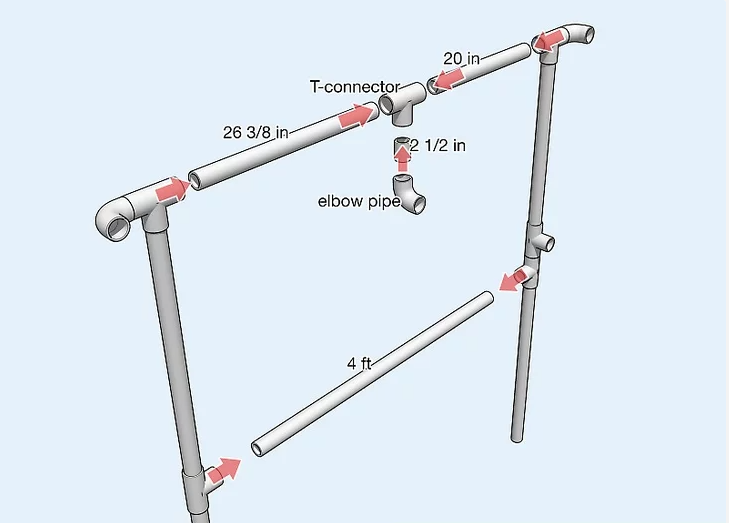
3. Build the Sides with Connectors
Now, begin building the sides of the booth by connecting the corner posts with additional connectors. At the top of the front corner pole, attach a 26 3/8-inch (0.67 m) section of pipe. Add a T connector, followed by a 20-inch (0.51 m) section, and connect the other end of this pipe to the back corner pole. In the middle of the side, connect a 4-foot (1.22 m) section between the front and back poles. Use a T connector to connect the middle of the side, adding a small pipe to attach an elbow joint facing inward.
Side Structure Completion
Repeat the same process for the other side of the booth. This step ensures that both sides of the frame are symmetrical and securely connected.
4. Connect the Sides with the Longer Poles
To complete the side structure, connect the sides using longer PVC poles. Insert a 5-foot, 11 3/4-inch (1.82 m) section into a T connector at the base of the middle pole. Attach a 3-foot, 11 7/8-inch (1.22 m) section on either side of the T connector. Place the smaller sections at the top of each wall, connecting the front and back poles. Finally, add 8-foot (2.43 m) sections along the top of the front, back, and middle of the back wall.
Poles Alignment
Do not fully secure the joints until you’ve placed all the poles, ensuring proper alignment and balance before tightening everything.
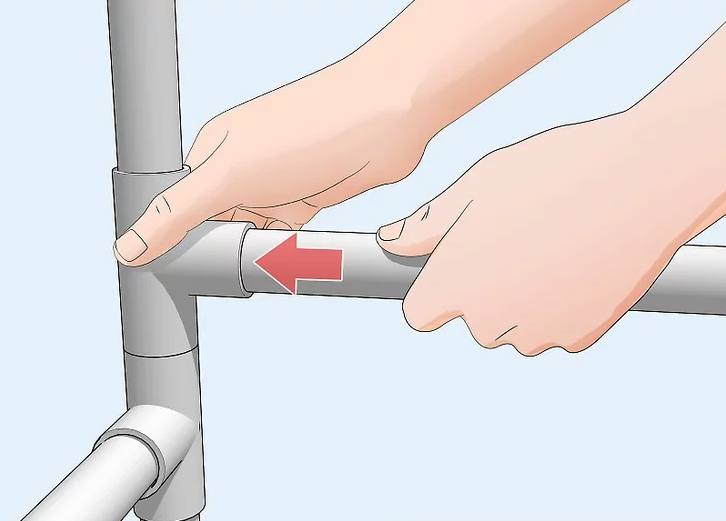
5. Secure the Pipes by Inserting Them Fully into the Joints
Once all the pipes are in position, proceed to secure each joint by fully inserting the pipes into their respective connectors. PVC joints are tough and won’t come apart easily, so apply firm pressure to ensure a tight fit. You may need to twist each pipe slightly to ensure everything is connected properly.
Final Securing Steps
This step guarantees the stability of the structure, ensuring that the booth will remain sturdy while in use.
References
- How to Build a PVC Frame: Complete Guide
- Tools for Assembling PVC Structures: Learn More
Part3 Enclosing the Booth
1. Cover the Booth with Plastic Sheeting
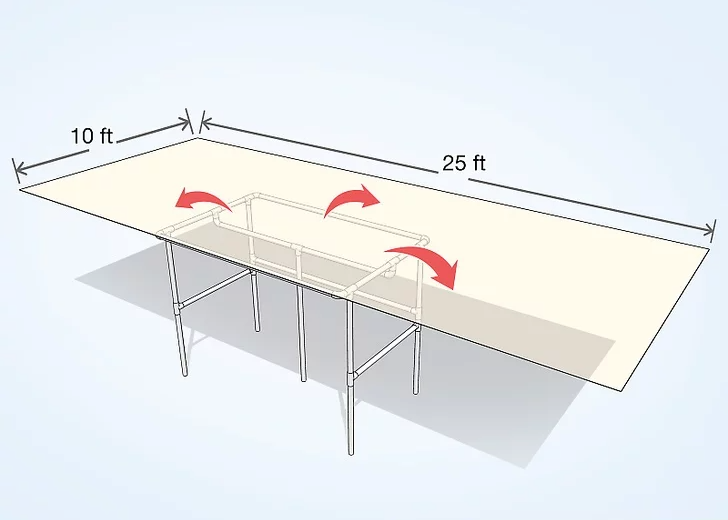
Lay a 10 by 25 ft (3.0 by 7.6 m) piece of plastic sheeting over the entire booth. Position the plastic so the long side runs up one wall, across the top, and down the opposite wall. Make sure the plastic extends enough to cover the back completely, leaving about 1 foot (0.30 m) of overhang at the front to drape over the pipes.
Plastic Placement Tips
Ensure the plastic is stretched tightly over the booth to avoid wrinkles or slack.
2. Trim and Tape the Plastic Along the Back
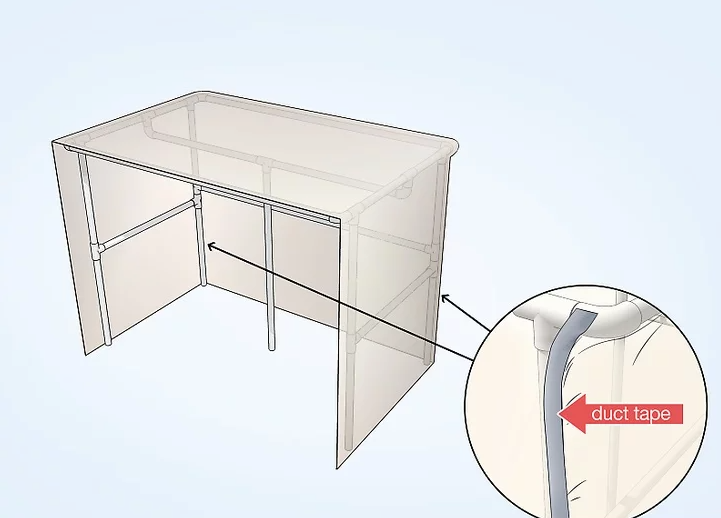
Trim and tape the plastic along the back of the booth. If possible, use clamps to hold the plastic in place as you work. Align the bottom edge of the plastic with the bottom of the booth and then cut the plastic from the bottom to the top corner of the booth. Use duct tape to secure the edge around the corner pole.
Securing the Plastic
If the tape doesn’t stick well, poke a hole through the plastic and tape the inside of the pole. Use a zip tie to secure the plastic to the pole for extra stability.
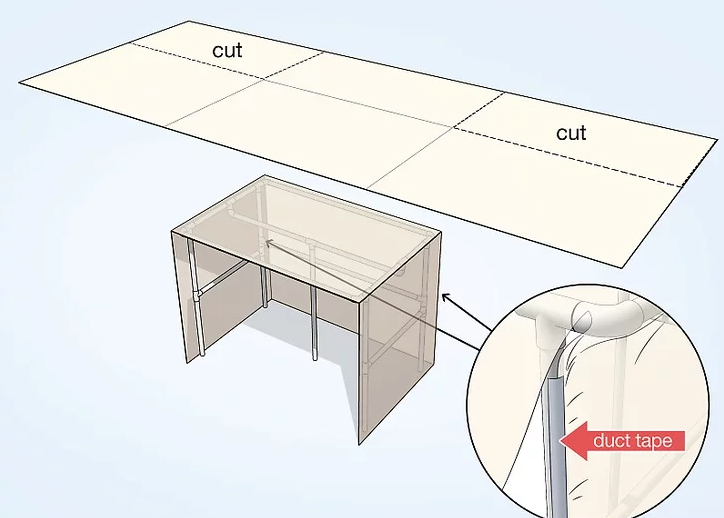
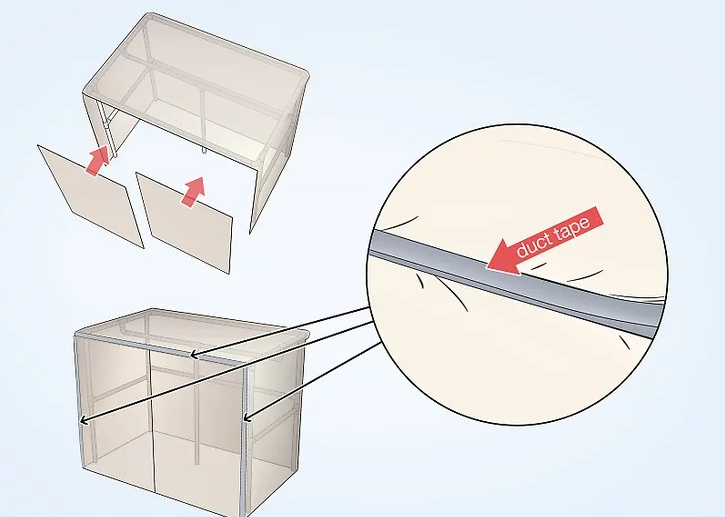
3. Cut and Tape the Sides in the Back
Once the back is secured, move on to the sides. Flatten the plastic along the side wall, cut it straight up from the bottom to the top corner, and tape the edge to the back pole. Seal the entire edge with tape for a secure fit. Repeat this process for the other side of the booth.
Corner Cutouts
After cutting, you will have two large square pieces of plastic. Save these for the front section.
4. Secure the Plastic at the Front
To complete the booth, pull the overhang at the front taut and tape it securely to the front poles. Use the pieces of plastic you saved from the back corners to cover the front, taping them along the top and corner poles. Ensure the seams are fully sealed to prevent paint from escaping.
Closing the Front Seam
Leave a small opening between the two front sheets, but seal the top and bottom edges. Once inside, use clamps to tightly close the front seam when you’re ready to paint.
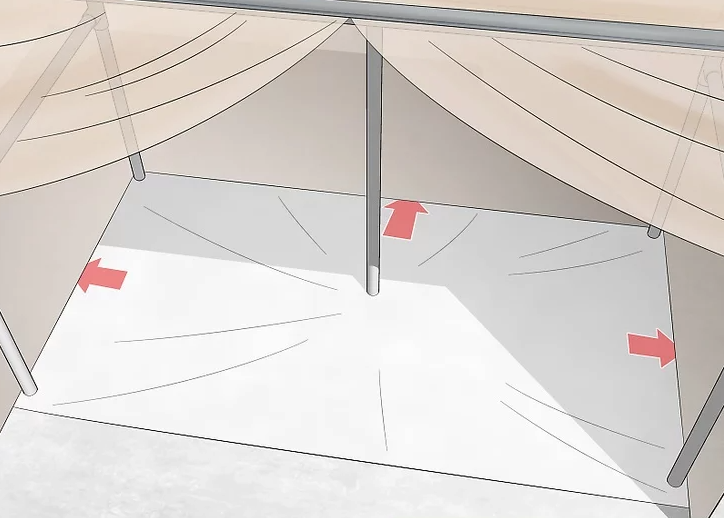
5. Lay Down a Drop Cloth Inside the Booth
Place a 4 by 15 feet (1.2 by 4.6 m) drop cloth inside the booth, positioning it so the corners rest on each leg of the booth. Smooth out any wrinkles or bubbles, and then lift each leg to push the edges of the cloth under the legs.
Drop Cloth Positioning
Ensure the drop cloth fits well under the booth’s legs. If it doesn’t line up, adjust the legs to be nearly perpendicular to the ground.
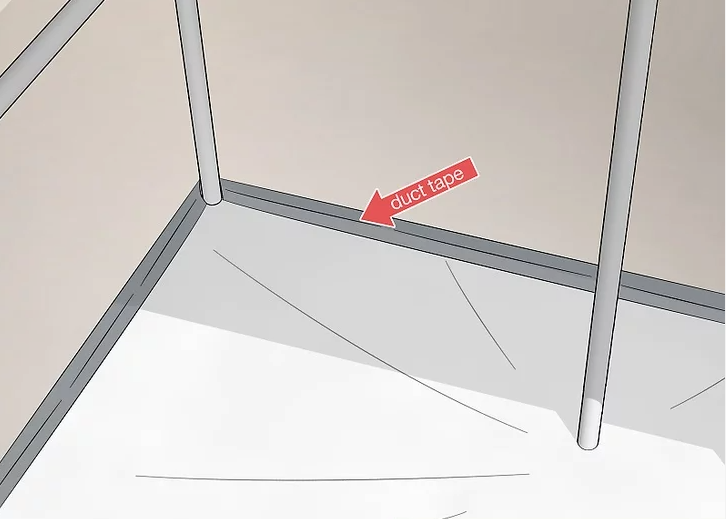
6. Secure the Plastic Sheeting on the Inside
Inside the booth, tape the plastic sheeting to the corners of the booth and secure it to the drop cloth. Start on one side, using duct tape to seal all the seams where the plastic and drop cloth meet.
Final Securing Step
This will ensure both the plastic and drop cloth stay in place and prevent any paint from leaking outside the booth.
References
- How to Set Up a DIY Paint Booth: Full Guide
- Securing Plastic Sheeting for a Spray Booth: Learn More
Part4 Adding Ventilation
1. Create a Structure for the Box Fan
Construct a temporary structure for the box fan using a small stepladder, cardboard boxes, or other available materials. Position the fan high enough to clear the middle PVC pipe of the paint booth, placing it outside on one side. If space is limited, position the structure about 1 inch (2.5 cm) away from the middle PVC pipe, with the ladder legs inside the booth but covered by plastic.
Fan Placement Tips
Make sure the fan is securely positioned at an appropriate height to maximize airflow within the booth.
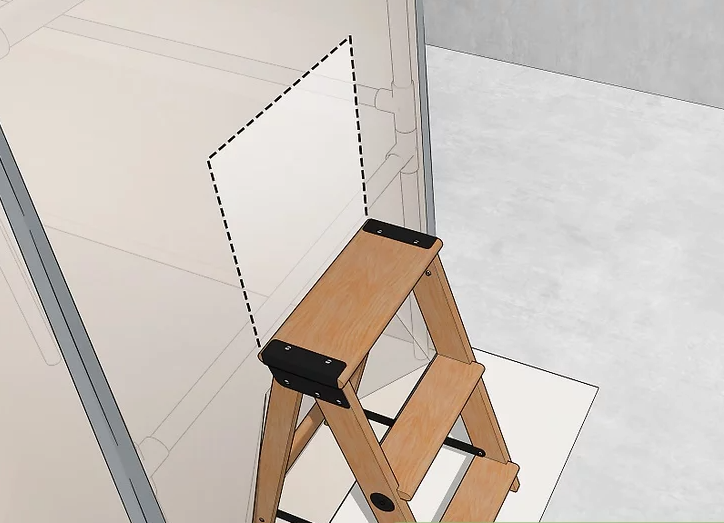
2. Cut a Hole for the Fan
Next, cut a hole in the plastic sheeting large enough to fit the fan snugly. The hole should be positioned at the height of the fan structure. Pull the plastic around the edge of the fan and seal the gap using duct tape. If necessary, add extra plastic to ensure a tight seal around the edges.
Sealing the Fan Area
Ensure there are no gaps around the fan, as this will prevent the booth from achieving proper airflow.
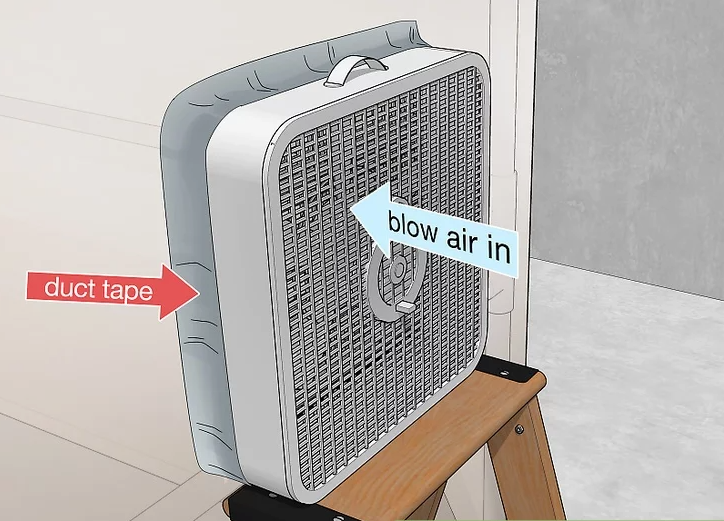
3. Face the Fan Toward the Inside of the Booth
Position the fan so that it blows air into the booth, creating positive pressure. This ensures that fresh air enters the booth, pushing out excess fumes and dust through another filter. Avoid facing the fan the other way, as it could suck dangerous fumes into the motor.
Fan Direction Matters
Directing the fan inward promotes airflow and helps prevent hazardous fumes from entering the motor.
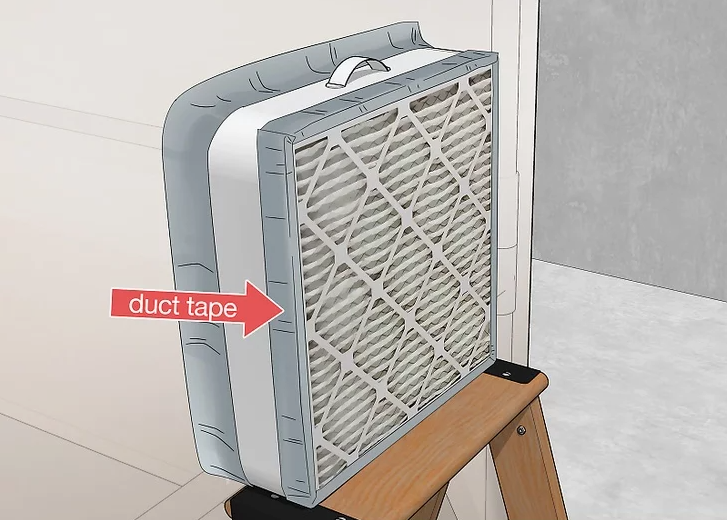
4. Tape a Furnace Filter to the Back of the Fan
Tape a furnace filter to the back of the box fan to prevent dust and overspray from entering the booth. Find a filter that matches the size of the fan and securely attach it with duct tape.
Alternative Filter Placement
If preferred, you can attach the filter to the side of the booth instead of the fan’s back. In this case, face the fan toward the filter to ensure proper air circulation.
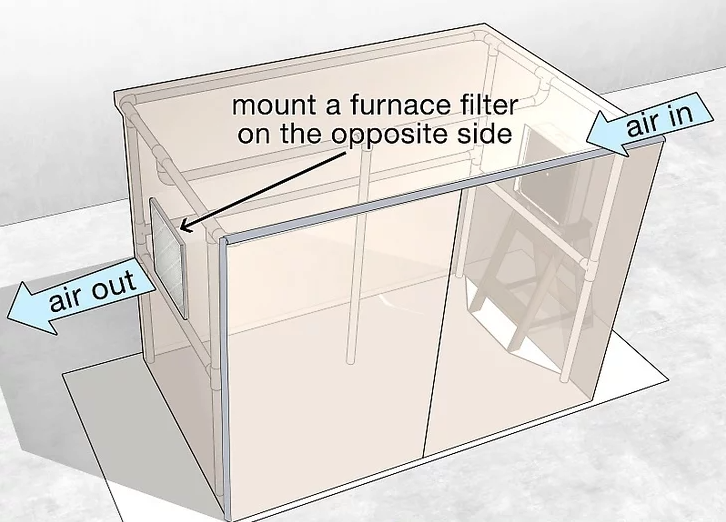
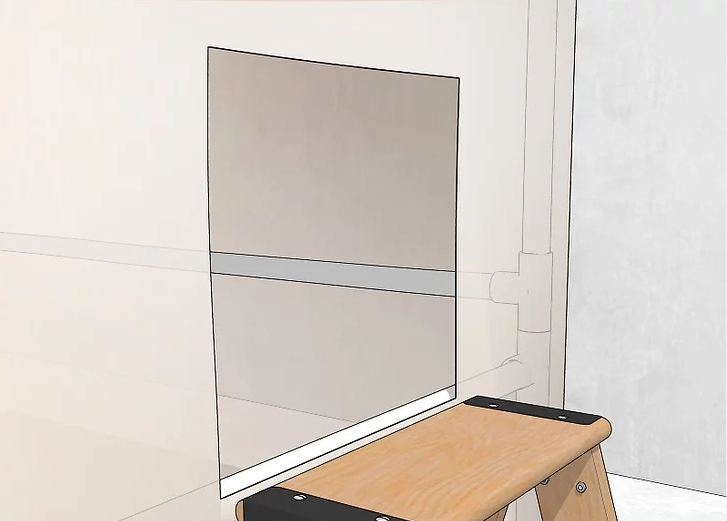
5. Mount a Furnace Filter in the Plastic
On the opposite side of the fan, cut a hole in the plastic large enough to fit a furnace filter. Tape the filter into place with duct tape, ensuring that the edges are completely sealed. This filter will allow air to exit the booth after passing through the fan.
Filter Placement Tip
Proper placement and sealing of the filter are crucial for maintaining airflow and air quality inside the booth.
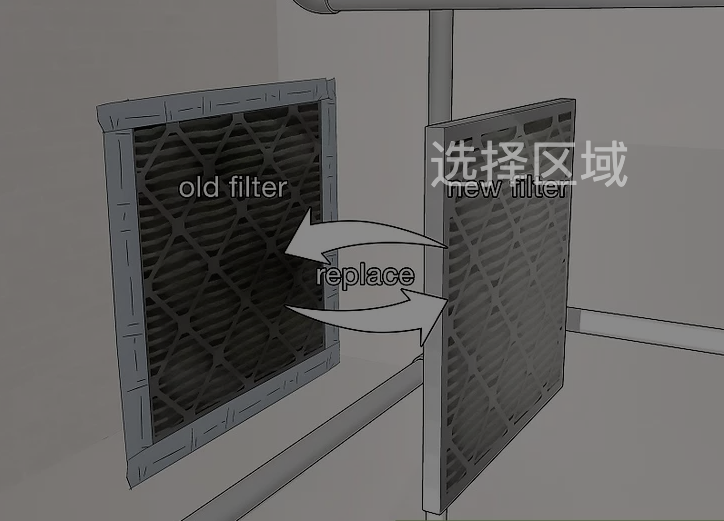
6. Replace Filters Regularly
Over time, furnace filters will accumulate overspray and paint dust. Regularly replace the filters by removing the old one with the existing duct tape or by cutting it out carefully. When applying a new filter, consider using a different color duct tape so you can easily identify which tape needs to be removed or replaced.
Filter Maintenance
Frequent filter changes ensure that the booth operates efficiently and remains safe to use for painting.
References
- Building a DIY Paint Booth with Box Fans: Guide to Fan Setup
- Maintaining a Paint Booth Air Filter: Tips on Filter Replacement